How to Make Authentic Clotted Cream: Your Guide to 3 Easy Home Methods
There’s an undeniable charm to the British afternoon tea, and at its heart, nestled alongside fluffy scones and delicate jams, lies the crown jewel: clotted cream. This wonderfully thick, luxurious spread is famous worldwide for its uniquely rich texture and subtle, cooked cream flavor. Traditionally hailing from the dairy farms of Devon and Cornwall in Great Britain, authentic clotted cream is a simple yet transformative creation made from just one ingredient: heavy cream.
For many, experiencing clotted cream means a trip across the Atlantic or a significant expense at a specialty gourmet market. But what if you could recreate this iconic delicacy in your own kitchen? It’s not as daunting as it sounds! In this comprehensive guide, we'll demystify the process and show you exactly
how to make clotted cream using three convenient home methods: the traditional oven bake, the gentle stovetop simmer, and the modern Instant Pot approach. Get ready to elevate your tea time with truly authentic, homemade clotted cream.
Understanding Authentic Clotted Cream: Taste, Texture, and Uses
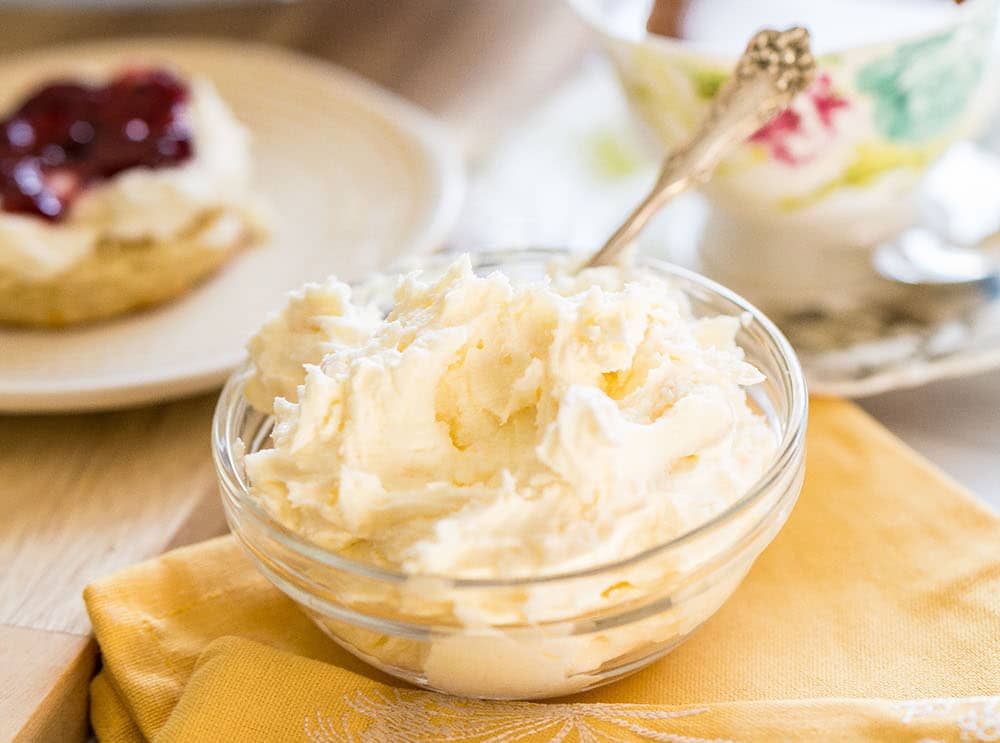
Before we dive into the methods, let's appreciate what makes clotted cream so special. Unlike whipped cream or crème fraîche, clotted cream boasts an unparalleled density and a velvety, almost custard-like mouthfeel. Its flavor profile is delightfully straightforward – a pure, unsweetened essence of cooked cream with a distinct richness that no other dairy product quite replicates. It’s thick enough to hold its shape beautifully, often developing a delightful "clotted" crust on top during its creation.
So, what is this culinary marvel used for? While its most iconic pairing is undoubtedly with warm, fresh scones, typically slathered generously before a dollop of strawberry jam (the Devon method) or after the jam (the Cornish method – a debate for another day!), its versatility extends further. You can enjoy homemade clotted cream on:
* Biscuits, muffins, and crumpets for a luxurious breakfast.
* Fresh berries or fruit tarts as a simple, elegant dessert topping.
* Pancakes or waffles for an indulgent twist.
* Even as a decadent accompaniment to certain savory dishes, though its sweet pairings are more common.
It's the essential component that transforms a simple meal into an authentic British tea experience.
The Secret Ingredient: Choosing the Right Cream
The foundation of exceptional clotted cream lies in the quality and type of heavy cream you use. This is perhaps the most crucial tip for success. The ideal choice is **regular pasteurized heavy cream** (also known as whipping cream), which typically has a fat content of 36% or higher.
Why "regular" pasteurized and not "ultra-pasteurized"? Ultra-pasteurized cream, which is heated to an extra-high temperature, has a longer shelf life but its protein structure is altered, making it less likely to clot properly and achieve that desired thick consistency. While some home cooks have reported success with ultra-pasteurized cream (especially if it's the only option available), for the most authentic and reliable results, seek out cream that explicitly states "pasteurized" rather than "ultra-pasteurized."
Finding regular pasteurized cream can sometimes be a challenge, as ultra-pasteurized varieties dominate many supermarket shelves. Look for it in organic sections, at specialty grocery stores like Whole Foods or Trader Joe's, or larger supermarkets with a wide dairy selection. Often, locally sourced dairy farms or co-ops are excellent places to find this type of cream. Aim for at least 3 cups (700ml) of heavy cream for a good yield.
The Three Authentic Methods for Homemade Clotted Cream
Now, let's explore the methods that transform simple heavy cream into that thick, luxurious spread. Each method relies on slow, gentle heat to encourage the cream to separate into rich, thick clots and a watery whey.
1. The Classic Oven Method
The oven method is widely considered the most traditional and foolproof way to make authentic clotted cream, offering a gentle, even heat that promotes excellent clotting and the formation of that desirable golden crust.
What you'll need:
* 3-4 cups (700ml-1 liter) regular pasteurized heavy cream
* An oven-safe, wide, shallow dish (e.g., a ceramic casserole dish, glass pie plate, or baking dish). A wider surface area allows for better evaporation and clotting.
Instructions:
1. **Prepare the Cream:** Pour your heavy cream into the shallow, oven-safe dish. Ensure the cream is at least an inch deep but not so deep that it won't heat evenly.
2. **Bake Low and Slow:** Preheat your oven to a very low temperature, typically between 180°F (82°C) and 200°F (93°C). Place the dish with cream into the preheated oven.
3. **The Waiting Game:** Let the cream bake for a minimum of 8 hours, and up to 12-14 hours. The goal is a very slow, gentle heat that prevents boiling or scorching. Do not stir the cream during this process. You'll know it's ready when a thick, yellowish-golden crust forms on the surface, and the cream beneath has visibly thickened and separated.
4. **Cool Completely:** Once the clotted cream has formed, carefully remove the dish from the oven. Let it cool completely at room temperature for several hours. This slow cooling is crucial for the clots to firm up.
5. **Chill and Skim:** Once cooled, cover the dish with plastic wrap and refrigerate for at least 8 hours, or preferably overnight. The colder it gets, the firmer the clots will be.
6. **Harvest Your Cream:** The next day, you'll find a thick, firm layer of clotted cream on top of a thinner, yellowish liquid (whey). Gently scoop the clotted cream from the top into a clean, airtight container. Discard the whey (or save it for baking!).
2. The Traditional Stovetop Method
While the oven method is preferred for its hands-off nature, the stovetop offers a viable alternative, especially if you prefer to keep an eye on things or don't want to run your oven for extended periods. This method requires a bit more vigilance to ensure the cream doesn't scorch or boil vigorously.
What you'll need:
* 3-4 cups (700ml-1 liter) regular pasteurized heavy cream
* A heavy-bottomed saucepan or a double boiler setup
Instructions:
1. **Gentle Heat:** Pour the heavy cream into your saucepan. If using a double boiler, fill the bottom pot with water and place the cream in the top pot. This provides the most gentle, indirect heat.
2. **Maintain a Simmer:** Place the saucepan over the lowest possible heat setting on your stove. The goal is to bring the cream to a very gentle simmer, where you see tiny bubbles just starting to form around the edges, but never a rolling boil.
3. **Slow Cook:** Let the cream cook for 6-10 hours, constantly monitoring the temperature to ensure it remains very low. You might need to adjust the heat periodically. If a crust forms too quickly or seems to be browning excessively, reduce the heat further. Again, resist the urge to stir.
4. **Cool and Chill:** Once a thick, clotted layer with a yellowish crust has formed on the surface, remove the pan from the heat. Let it cool completely at room temperature, then cover and refrigerate for at least 8 hours or overnight.
5. **Scoop and Enjoy:** Skim off the thick clotted cream and transfer it to an airtight container, separating it from the watery whey.
3. The Modern Instant Pot Method
For those with a multi-cooker, the Instant Pot offers a fantastic, almost entirely hands-off way to make clotted cream with consistent results. Its precise temperature control is perfect for the slow, low-heat cooking required. For a more detailed guide on this specific method, check out our comprehensive
Instant Pot Clotted Cream Guide: Perfect for British Scones.
What you'll need:
* 3-4 cups (700ml-1 liter) regular pasteurized heavy cream
* An Instant Pot (or similar multi-cooker with a "Yogurt" setting)
Instructions:
1. **Prepare the Pot:** Pour the heavy cream directly into the inner pot of your Instant Pot. There's no need for a trivet or water bath for this method.
2. **Activate Yogurt Setting:** Close the lid and ensure the vent is sealed. Select the "Yogurt" setting on your Instant Pot. The yogurt setting is designed to maintain a consistent low temperature, ideal for clotted cream.
3. **Set the Time:** Set the timer for 8-10 hours. Some Instant Pot models might default to a specific "boil" or "ferment" sub-setting within yogurt – you'll want the one that provides gentle, sustained heat.
4. **Natural Release & Cool:** Once the cooking cycle is complete, let the Instant Pot naturally release pressure and cool down for at least 1-2 hours without opening the lid.
5. **Refrigerate:** Open the lid and let the cream cool further at room temperature for a couple of hours. Then, cover the inner pot with plastic wrap or transfer the cream to an airtight container, and refrigerate for at least 8 hours, or preferably overnight.
6. **Harvest:** The clotted cream will have separated into a thick layer with a crust on top and a thin layer of whey underneath. Gently scoop the firm clotted cream into a clean container.
Pro Tips for Perfect Clotted Cream
*
Patience is Key: Regardless of the method, the most crucial ingredient is patience. The long, slow cooking and cooling times are essential for proper clotting.
*
Don't Disturb: Avoid stirring or agitating the cream during the cooking process. This can prevent the fat from separating correctly.
*
Storage: Homemade clotted cream will last about two weeks in an airtight container in the refrigerator. Always use a clean spoon to scoop it out to prevent contamination.
*
Freezing (with caution): While you can technically freeze clotted cream, its delicate texture might become slightly grainy upon thawing. If you do freeze it, use it in baked goods rather than for spreading on scones.
*
Don't Waste the Whey: The leftover whey isn't just waste! It's excellent for adding moisture and flavor to baked goods like bread, scones, or muffins.
*
Crust Love: That yellowish, slightly firmer crust that forms on top is a hallmark of authentic clotted cream. Don't discard it – it's part of the delight!
Beyond the Basics: A Quick Alternative (and its Difference)
While the methods above yield truly *authentic* clotted cream, sometimes time is of the essence, or the specific cream isn't available. If you're in a pinch and need a quick, delicious spread that mimics the richness and tang of clotted cream, there are "mock" recipes available. These often combine ingredients like cream cheese, heavy cream, powdered sugar, and vanilla to create a similar texture and flavor profile in just minutes. It's a fantastic shortcut for convenience, but it's important to understand it's a different product from the slow-cooked, single-ingredient authentic version. If you're curious to try a faster option, you can explore recipes like this one:
Quick Clotted Cream: Make a 5-Minute DIY Recipe at Home.
Conclusion
Making authentic clotted cream at home is a rewarding culinary adventure that brings a touch of British elegance to your kitchen. With just one simple ingredient – high-quality heavy cream – and a bit of patience, you can master any of these three methods to create a spread that rivals any imported jar. Whether you choose the reliable oven, the careful stovetop, or the convenient Instant Pot, the result will be a delightfully rich, thick, and flavorful clotted cream perfect for your next batch of scones or a special afternoon tea. So, gather your cream, pick your method, and prepare to indulge in this classic British delight!